My mom found a fabric store near her that I think is a Japanese fabric store. The store is called Momen+ and is in Torrance, CA. There's not much info on the store's website, but there are 12 reviews on Yelp and they are all pretty positive. I have yet to visit the store, but my mom went recently and bought a couple mini quilt block kits and she mailed them to me!!!!!! Best mom ever! :)
I came home on Friday to a package and was so thrilled to find two mini quilt block kits with pre-cut Japanese fabric:


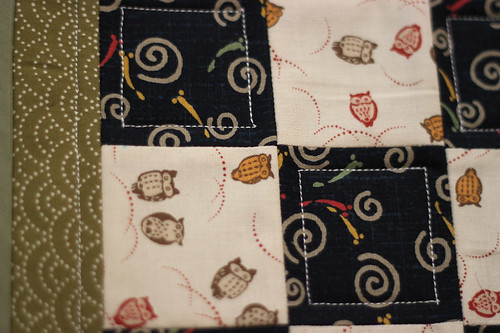
Here are some close-ups of the fabric. I think the owl print is really adorable.

So even though I've been quilting for a couple months, I haven't made any blocks consisting of small shapes. I've been wanting to try making a disappearing nine-patch block quilt in order to get more practice lining up seams {just perfectly!} but that requires buying more fabric, which I don't want to do until all my current projects are done. So I was thrilled to see that one of these quilt kits was for a nine-patch block.
My mom mentioned that the lady at the store gave her instructions in English so she included them in the package she sent. However, I discovered that the instructions weren't exactly step-by-step instructions on how to complete the mini quilts, but just general quilting instructions. Thankfully, after staring at the kit contents for a couple minutes I was able to figure it out. The border pieces confused me the most because the block sketch on the front of the kit "cover" didn't include a border, so it was a bit misleading. I quickly got to work on the mini-quilt and was determined to finish it that night. Here's the front (or top):
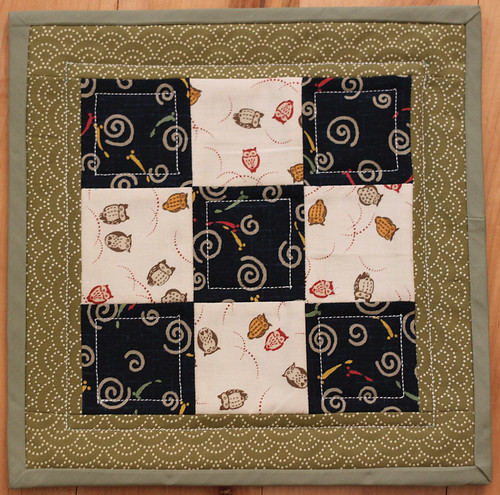
Here's a close-up detail of the front:
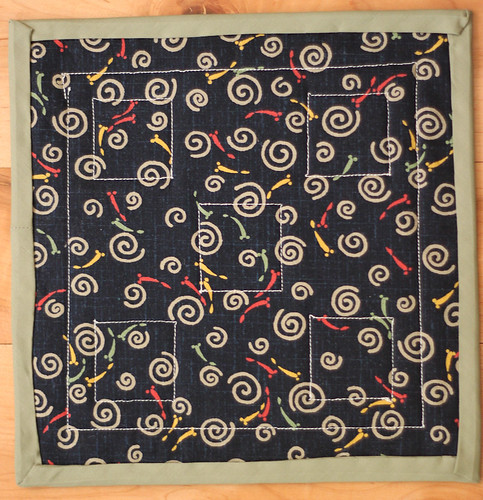
I'm not as thrilled with the back because the quilting stitching didn't quite line up at the beginning and end. I made the mistake of stitching the outer square on the green fabric first and the quilt layers got kinda smushed around. I should have quilted the center square first and then worked my way outward. But here's a photo of the back:
It was really refreshing and motivational to be able to finish a project in one night. I was so excited with the outcome that I almost started the second mini quilt that night, but I wanted to save it for the next day. These are definitely great kits for someone just starting to learn how to quilt. All the fabric is pre-washed and everything you need is in the kit, including the batting and bias tape/binding. I'm not quite sure where I'll put this mini quilt. I'm thinking of sewing or attaching some sort of handle or loop to the top so it can be a wall hanging. Otherwise, I may use it as a large coaster :)
I came home on Friday to a package and was so thrilled to find two mini quilt block kits with pre-cut Japanese fabric:
Here are some close-ups of the fabric. I think the owl print is really adorable.
 |
| Don't these look like origami paper?? |
My mom mentioned that the lady at the store gave her instructions in English so she included them in the package she sent. However, I discovered that the instructions weren't exactly step-by-step instructions on how to complete the mini quilts, but just general quilting instructions. Thankfully, after staring at the kit contents for a couple minutes I was able to figure it out. The border pieces confused me the most because the block sketch on the front of the kit "cover" didn't include a border, so it was a bit misleading. I quickly got to work on the mini-quilt and was determined to finish it that night. Here's the front (or top):
Here's a close-up detail of the front:
I'm not as thrilled with the back because the quilting stitching didn't quite line up at the beginning and end. I made the mistake of stitching the outer square on the green fabric first and the quilt layers got kinda smushed around. I should have quilted the center square first and then worked my way outward. But here's a photo of the back:
It was really refreshing and motivational to be able to finish a project in one night. I was so excited with the outcome that I almost started the second mini quilt that night, but I wanted to save it for the next day. These are definitely great kits for someone just starting to learn how to quilt. All the fabric is pre-washed and everything you need is in the kit, including the batting and bias tape/binding. I'm not quite sure where I'll put this mini quilt. I'm thinking of sewing or attaching some sort of handle or loop to the top so it can be a wall hanging. Otherwise, I may use it as a large coaster :)
Comments
Post a Comment