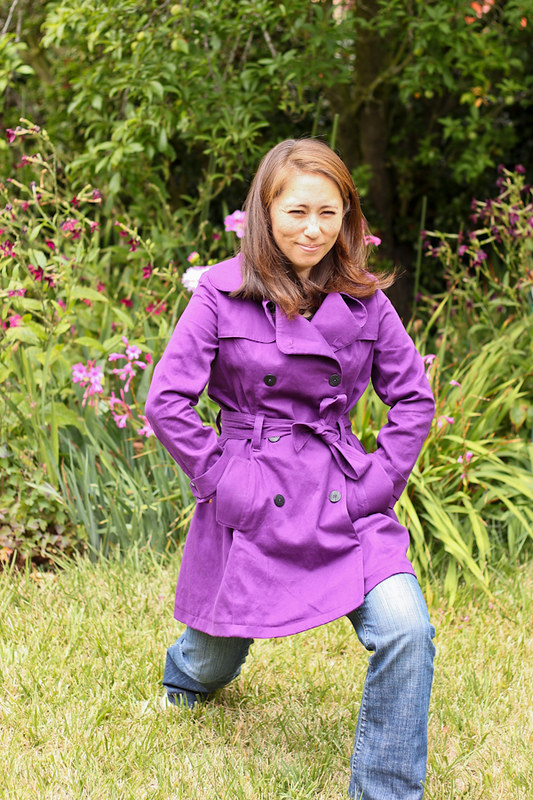
The Sewaholic Robson Coat took so long to make! And this post is going to be so long! You can skip to the very end of the post if you're only interested in the details.
First of all, I spent so much time searching for fabric. I spent many many hours browsing fabric online trying to determine which type of fabric would be best for this coat: cotton, twill, fine line twill, poplin, rayon poly, poly cotton, cotton nylon blend, etc. Confused? Yeah, me too. I finally bought a dark purple cotton twill from Fabric.com. I considered getting a swatch first, but I was too inpatient. Besides, at under $6/yard, I figured if I didn't love the fabric, then it could at least be a wearable muslin. The fabric is definitely lightweight; I can even do lunges while wearing the coat!
I also decided to make sure I spent as much time as possible on this coat by photocopying all the pattern pieces. This pattern looked so awesome and I just couldn't bring myself to cut the actual pattern. This part took forever, but I'm glad I did it. I still don't want to cut the actual pattern! I did save time by not making a muslin, because who cares about getting the fit right. I took a deep breath and cut a straight size 2 for every piece, praying that it would all fit properly.
I ended up shortening the midsection by 2-3 inches and I brought up the hem by 6 inches! SIX! Partly because I didn't want a super long trench coat and partly because I'm really freaking short. But, these changes meant that I was able to fit everything on 3 yards of 60" wide fabric. THREE YARDS!!!! It took some tinkering, but I got it all to fit.
I worked on this jacket in pieces (just like Tasia recommended) and I kinda like the order I followed: belt, belt loops, epaulettes, sleeve tabs, collar, back/shoulder facings, back, pockets, sides, front, buttons, and sleeves. I'm not one to normally do short spurts of sewing every night, but I was able to sew the small pieces during commercial breaks while freaking out during LA Kings games (they just got bounced from the playoffs this weekend....sad face).
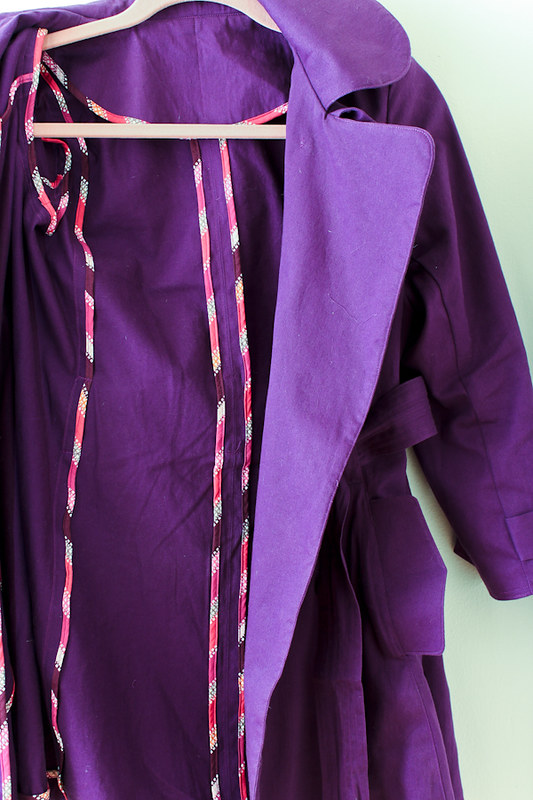
The major labor of love is showcased in the binding. I first thought about buying adorable binding from Momen+, but I didn't want to drive all the way down there. I did buy a couple packs of plain red bias binding from International Silks & Woolens (unfortunately, no online store) when I was there buying thread to match my purple fabric. But then a lightbulb went off in my head when I was sewing the back pieces together. I already had THE PERFECT fabric in my stash to make bias binding. It's an Art Gallery fabric I bought at Sew LA a couple years ago. I recently tried making a blouse out of it that turned into a disaster, but I have so much left over that I was able to bind all of the seams using this fabric and I still have a lot leftover.
However, making my own bias binding took forever. I have no idea how many yards I made because I made it as it was needed. If you decide to make your own bias binding, then definitely get a Clover bias tape maker because it is a total life saver.
I originally wanted to get a buckle for the belt tie, but couldn't find one that I liked.. I did stitch every 1/4" along the belt to give it some texture. I have a short lightweight cotton jacket from J Crew that I love which has this detail. I might also interface the belt next time I make this coat....just a thought.
I had the most difficult time figuring out the button placement since I shortened the coat so much. I think the second row is too low; I think the buttons need to be on the upper part of my bust, not the lower part. I also spent way too much time picking out buttons. The pattern calls for 3/4" buttons, but they looked small in the store. I actually pulled out Lladybird's post while I was at the store buying buttons; not to knock her amazing coat, (because holy crap, it's amazing) but I thought her buttons looked small and wanted to see if she used 3/4" buttons or something smaller. Thankfully, in the comments she mentioned using the suggested 3/4" buttons so I went up a size to 7/8" buttons. I still think the buttons look a bit small, so next time I'm going to use 1" buttons. My suggestion is to find a coat in a somewhat similar style that you like and measure those buttons. I forgot to do this before I left for the store and sure enough, a jacket that I wear a lot has 1" buttons.
The Deets
Fabric: 3 yds Purple Cotton Twill from Fabric.com
Thread: Coats and Clark.
Needle: I started with a 75/11 needle, but eventually switched to a 90/14 needle when the layers got thick. (I think this the correct method, but let me know if I did it wrong)
Size: 2 (next time I'm going to use size 0)
Alterations: Shortened mid-section by 2 inches; Shortened hem by 6 inches; Shortened sleeves by 3 inches Bias Binding: DIY with Art Gallery quilting cotton fabric
Buttons: 16 - 7/8" buttons
Hours to make: don't even want to think about it...
Notes for next time (because I definitely want to make it again!)
Fabric: Use a higher quality fabric. I recently browsed the Burberry line of trench coats to get ideas of fabric type....now where do I find these awesome fabrics? Next question: am I prepared to spend the beaucoup bucks for high-end fabric?
Pattern: Despite all the shortening I did, I want it even shorter. I also want to try it without the back flap and maybe only one front flap; perhaps this way I can get away with 2.5 yards.
Buttons: Now that I know what size to buy, I'm going to try and buy them online for cheaps. I spent $1.80/2-pack of buttons and bought 8 packs, which seems like a lot for buttons...
Notions: Find a suitable buckle. I want a version I don't have to tie.
Thanks for reading if you made it this far!
First of all, I spent so much time searching for fabric. I spent many many hours browsing fabric online trying to determine which type of fabric would be best for this coat: cotton, twill, fine line twill, poplin, rayon poly, poly cotton, cotton nylon blend, etc. Confused? Yeah, me too. I finally bought a dark purple cotton twill from Fabric.com. I considered getting a swatch first, but I was too inpatient. Besides, at under $6/yard, I figured if I didn't love the fabric, then it could at least be a wearable muslin. The fabric is definitely lightweight; I can even do lunges while wearing the coat!
 |
| My dad and I are available to coordinate your photo shoot. I promise there won't be a dull moment! |
I ended up shortening the midsection by 2-3 inches and I brought up the hem by 6 inches! SIX! Partly because I didn't want a super long trench coat and partly because I'm really freaking short. But, these changes meant that I was able to fit everything on 3 yards of 60" wide fabric. THREE YARDS!!!! It took some tinkering, but I got it all to fit.
I worked on this jacket in pieces (just like Tasia recommended) and I kinda like the order I followed: belt, belt loops, epaulettes, sleeve tabs, collar, back/shoulder facings, back, pockets, sides, front, buttons, and sleeves. I'm not one to normally do short spurts of sewing every night, but I was able to sew the small pieces during commercial breaks while freaking out during LA Kings games (they just got bounced from the playoffs this weekend....sad face).
The major labor of love is showcased in the binding. I first thought about buying adorable binding from Momen+, but I didn't want to drive all the way down there. I did buy a couple packs of plain red bias binding from International Silks & Woolens (unfortunately, no online store) when I was there buying thread to match my purple fabric. But then a lightbulb went off in my head when I was sewing the back pieces together. I already had THE PERFECT fabric in my stash to make bias binding. It's an Art Gallery fabric I bought at Sew LA a couple years ago. I recently tried making a blouse out of it that turned into a disaster, but I have so much left over that I was able to bind all of the seams using this fabric and I still have a lot leftover.
 |
| Too matchy-matchy? Eh, I like it! |
I originally wanted to get a buckle for the belt tie, but couldn't find one that I liked.. I did stitch every 1/4" along the belt to give it some texture. I have a short lightweight cotton jacket from J Crew that I love which has this detail. I might also interface the belt next time I make this coat....just a thought.
I had the most difficult time figuring out the button placement since I shortened the coat so much. I think the second row is too low; I think the buttons need to be on the upper part of my bust, not the lower part. I also spent way too much time picking out buttons. The pattern calls for 3/4" buttons, but they looked small in the store. I actually pulled out Lladybird's post while I was at the store buying buttons; not to knock her amazing coat, (because holy crap, it's amazing) but I thought her buttons looked small and wanted to see if she used 3/4" buttons or something smaller. Thankfully, in the comments she mentioned using the suggested 3/4" buttons so I went up a size to 7/8" buttons. I still think the buttons look a bit small, so next time I'm going to use 1" buttons. My suggestion is to find a coat in a somewhat similar style that you like and measure those buttons. I forgot to do this before I left for the store and sure enough, a jacket that I wear a lot has 1" buttons.
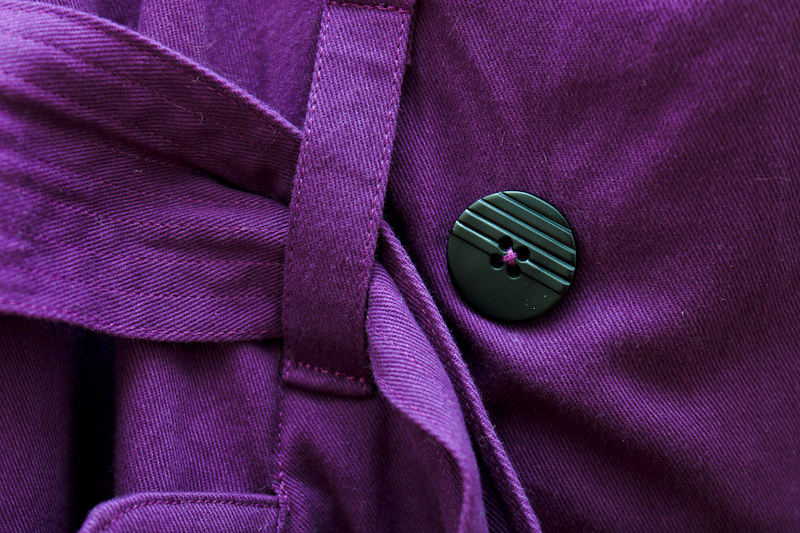 |
| Button/Belt/Topstitching detail |
Fabric: 3 yds Purple Cotton Twill from Fabric.com
Thread: Coats and Clark.
Needle: I started with a 75/11 needle, but eventually switched to a 90/14 needle when the layers got thick. (I think this the correct method, but let me know if I did it wrong)
Size: 2 (next time I'm going to use size 0)
Alterations: Shortened mid-section by 2 inches; Shortened hem by 6 inches; Shortened sleeves by 3 inches Bias Binding: DIY with Art Gallery quilting cotton fabric
Buttons: 16 - 7/8" buttons
Hours to make: don't even want to think about it...
Notes for next time (because I definitely want to make it again!)
Fabric: Use a higher quality fabric. I recently browsed the Burberry line of trench coats to get ideas of fabric type....now where do I find these awesome fabrics? Next question: am I prepared to spend the beaucoup bucks for high-end fabric?
Pattern: Despite all the shortening I did, I want it even shorter. I also want to try it without the back flap and maybe only one front flap; perhaps this way I can get away with 2.5 yards.
Buttons: Now that I know what size to buy, I'm going to try and buy them online for cheaps. I spent $1.80/2-pack of buttons and bought 8 packs, which seems like a lot for buttons...
Notions: Find a suitable buckle. I want a version I don't have to tie.
 |
| Note to self: stand up straight |
Wow, this is beautiful! I love your purple Robson coat, it's so fun! This is one of my favorite versions that I have seen so far. I also really like your extra stitching detail that you did on the belt tie. I never would have thought of doing that and it looks great (really professional!). I may have to borrow that detail when I finally get to sewing up mine too (as long as you don't mind, of course!). Awesome coat - you did a fantastic job! :-)
ReplyDeleteThanks! I'm glad you like the top stitching on the belt. It doesn't give much extra structure to the belt, but I think it's a nice detail. Also, my fabric wrinkles a bit easily so the extra stitching helps prevent any noticeable wrinkles. Give it a try!
Delete