I have several Monetas to share with you today. I thought about doing separate posts for all three since they were made with different types of knits and I constructed each of them a bit differently. Buuuuutttt, I figured that might get a bit boring for ya'll. So instead this will be quite a photo-heavy post.
I made my first Moneta Dress in a black ponte knit that I got a Jo-Anns. I was so excited to make this dress that I couldn't wait till the weekend to find a knit so I stopped by Jo-Anns on my way home from work one day and bought the solid knit that had the nicest touch. There's not much stretch, but it's really soft.
I originally cut the bodice in a size XS, but due to the lack of stretch in this fabric, I could barely fit it over my shoulders and bust so I re-cut the bodice in a size S (I don't know about you, but I find that Colette Patterns suggests a lot more fabric than is needed, at least for the smaller sizes; thankfully this time I bought the suggested fabric requirement so I had enough leftover to re-cut another bodice). There ended up being a bit of extra fabric pooling at the bust/armhole, which I now know how to fix thanks to Miss Make's tutorial.

I definitely struggled with the clear elastic gathering at the top of the skirt, but practice makes perfect so I'll just keep at it. My recommendation is to just stretch the hell out of it in order to gather properly.
I stitched this dress entirely on my regular sewing machine with a narrow, but longer zig-zag stitch and everything seems to look fine. The only reason I didn't use my serger is because at the time I had white thread on it and I did not want to change thread. I originally interfaced the collar and ties, but I eventually took out the interfacing because the ties became super stiff and awkward-looking.
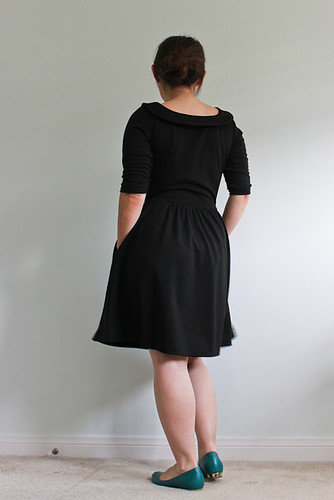
I paired this dress with teal flats and got my first handmade wardrobe compliment! I was leaving work and entered an elevator with an older lady. She immediately exclaimed, "that is such a pretty dress!". My husband said that was such an old lady thing to say, but whatever, I'll take it! Also, in case you were wondering, it is really freaking difficult to take self-timed photos of a black dress!
I decided to try making a Moneta shirt/blouse because this was around the time the Nettie bodysuit came out from Closet Case Patterns and I saw Lauren's post about transforming it into a close-fitting shirt. I figured the Moneta could become a shirt too and I had this beige/cream striped fabric laying around just waiting to be turned into a shirt.
I spent a lot of time cutting everything so the stripes would match at the seams and at the collar. I had just enough fabric to match everything. I did not interface the collar, but totally regret it because there are ripples around the edges and it sorta flops around. I think it looks really sad :(
I cut a size S bodice, but ended up taking in the side seams a bunch so I'm pretty sure I ended up with an XS bodice. This fabric has more stretch than the black ponte and I wanted a close-fitting shirt anyway. I wish I had lengthened the bodice a bit more because it's a tad too short to wear untucked with jeans. It does look pretty good tucked into shorts and skirts though.
I don't have a walking foot so the stripes at the side seams don't match too well. I also did a piss poor job of using stitch witchery at the hem so the hem doesn't look as good. But overall I'm pretty happy with it and can definitely see myself making more shirts with this pattern.
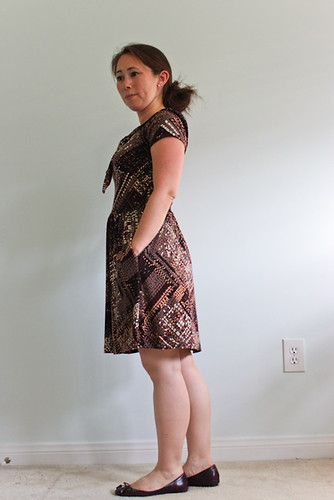
The 2nd Moneta dress I made was out of some slinky knit; I can only guess that it might be a rayon blend because it has great drape, but was a bit slippery to work with. I bought it for $2/yard at the FIDM scholarship store so I don't know the exact content of this fabric. I used an XS this time because the fabric has a lot of stretch.
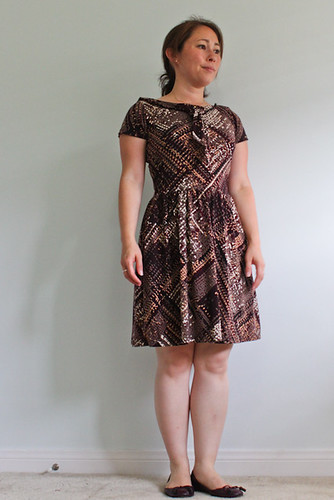
I did a terrible job at constructing this dress, but it's so comfy to wear. I still can't tell if this fabric print is awesome or terrible on me, but whatever, idgaf. I tried serging the pockets to the skirt and almost completely ruined the dress. If I stand straight, then you can see the seam is wonky, but it's not that noticeable thanks to the movement of this dress. The Moneta sewalong came out after I made all three versions so I didn't find out till much later that you really should attach the pockets to the skirt using a regular machine zig-zag stitch. Lesson learned.....
Not much else to say about this dress. I used stitch witchery on the sleeves and hem because it was difficult to keep the two layers from shifting without a walking foot. This time I made sure to press the hell out of it with a damp cloth to make sure the stitch witchery adhered (or melted?) to the fabric to keep it in place.
I actually have a fourth Moneta in the works. I'm making a sleeveless version that may end up reversible since I plan on fully lining it. I'm excited about its potential so hopefully it turns out as good as I'm imagining it in my head!
How many Monetas have you made???? Based on other blogs I follow I know that I'm not the only one slightly obsessed with this pattern. :)
P.S. sorry for the perpetual bitch-face in all of my photos. I cannot for the life of me take a good smiling photo of myself using the self timer. (or when I do capture a smile I end up cutting off half of my head...see above photo) I have total derp face when I try to smile, so unfortunately all of my "best" photos have me looking like a total biatch instead. #sorrynotsorry
I totally think the fabric works in Moneta #3, it's awesome! And what a clever idea to make a shirt. I've got to try that sometime!
ReplyDeleteThanks Erin! Definitely give the shirt a try. A fairly easy pattern made even easier!
DeleteLove all of your monetas! I've made 2 and have plans for more.
ReplyDeleteThanks, Mary! This dress is so easy to make I'm worried I might end up with an entire closet full of them :) Can't wait to see what yours look like!
DeleteI really like the fabric in #3 -- biatch face and all :)
ReplyDeleteHaha, oh man I should teach myself how to smile in self-portraits. Or maybe I should just embrace the biatch face :)
Delete