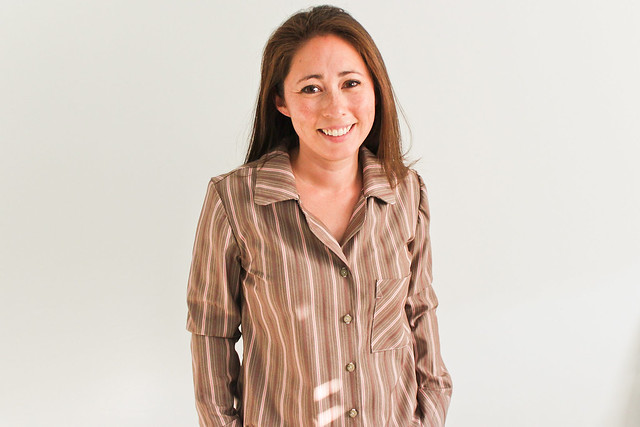
I was thrilled {{THRILLED!!}} to be asked to test the latest Closet Case Files Pattern, the Carolyn Pajamas.
Not gonna lie, I was totally thrown off by pajamas. When Heather Lou had hinted on her blog that several patterns were in development I did not expect pajamas at all. But who doesn't want cute and coordinated pajamas? {and sexy, if you go that route} I don't think I've had coordinated pajamas since I was a kid so this pattern definitely filled a wardrobe hole, something I had been thinking of making ever since seeing Peneloping's cat pajamas.
Just be aware that this review is of the pattern tester version. There have been several changes, including sizing, in the final version, but I wanted to post about the tester version because I'm so happy with how it turned out.
The pattern is available as a pdf, which of course involves printing, cutting, taping.....lots and lots and lots of it. Not gonna lie. There is a fucking shitload of paper in this pattern, especially if you make the long sleeve top and long pants. I know some of you are adamantly against pdf assembly, but I don't think it's too bad if you just set yourself up in front of a good show (may I recommend a Law & Order marathon) and take it one to two rows at a time. Honestly, you don't have to assemble the whole damn thing at once. Usually after a couple rows you'll see if you can cut out a piece or two. It's much more manageable if you cut away pieces while you assemble the rows.
Anyway, off my pdf assembly soap box.....I cut a size 2 for both the tops and bottoms. The finished measurements for the tester showed quite a bit of ease in the bodice and I didn't want to be swimming in my top. However, I foolishly forgot to check the bottoms measurements, which was a huge mistake. So don't forget to check both your bust and hip measurement to make sure you're making the correct size for the top and bottom.
Pants
If you've made the Sewaholic Tofino PJs, then you'll find these easier to construct. I'm not sure why these patterns are constructed differently (and I'm too lazy to compare the patterns), but the Carolyn PJ pants construction seemed really straightforward in comparison.
I gave Heather two subjective comments regarding the pants.
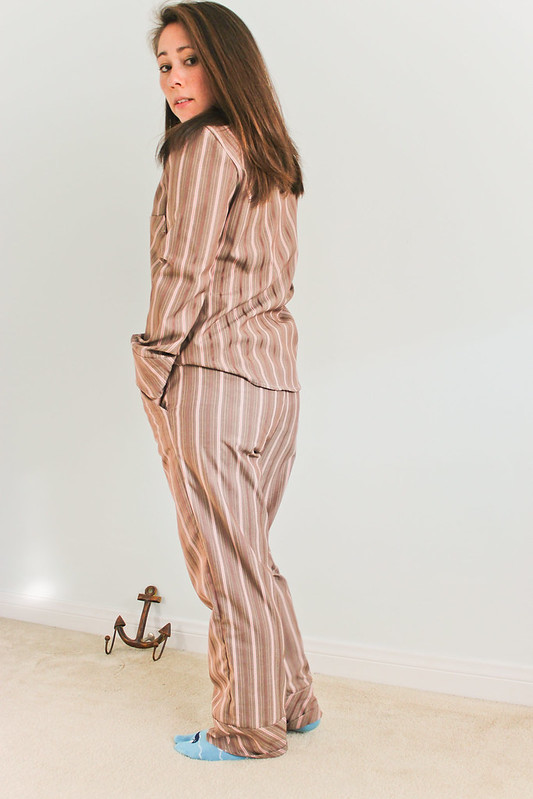
1) I found the tester version to be slim in the pants, but apparently most testers thought they were too big. Part of the difference could be I made the wrong size and part of it is maybe because I like my PJ pants to be on the baggier side. {I'm swimming in my Tofino PJ pants, but I kinda like it!}
Heather did make changes in sizing for the final version, so I would strongly recommend you check the final measurements and do a quick check of the pattern pieces based on your widest measurement {for me, my hips, around the fullest part of my booty, are the widest}.
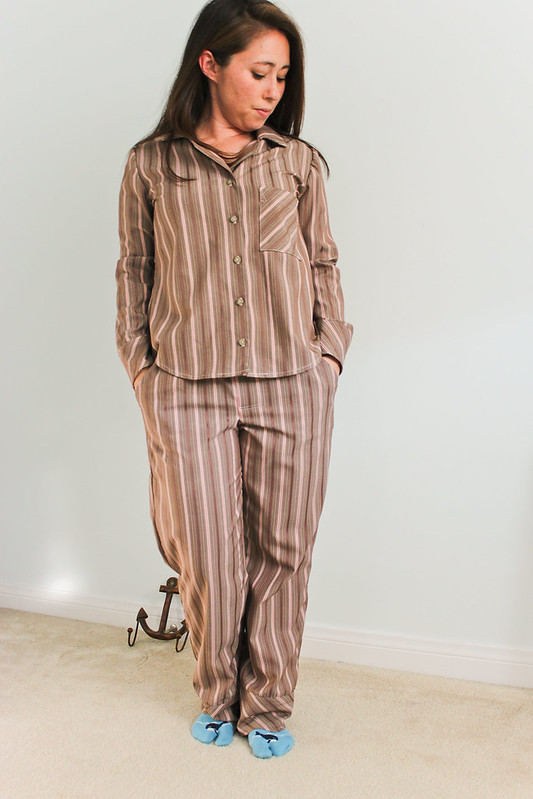
2) the cuffs were deep, which I think looked odd on my short self. I like them better folded in half (see above photo). I think Heather decreased the size of the cuffs on the final version, but if you're shorty like me, just take that into consideration.
I really like the pockets that are included in the pants.During the holidays I practically lived in my Tofino pajama pants and, I kid you not, I kept trying to put my hands in pockets! And every time I did, I was so disappointed I didn't have any. It's like Heather Lou was reading my mind. You can't tell in any of the photos, but I matched stripes along the pockets! **total nerd over here**
Top
I gave Heather one comment regarding the pocket construction, which seems silly because it's just a pocket. But a couple of my mens button-up shirt patterns use a different folding/construction method, which makes for a clean finish on the upper edges. Also, the original placement of the pocket is much too low on me. That was the first thing my husband noticed when I showed him my fancy PJs. He was insistent that I need to rip it out and move it higher, but I'm just too lazy to do it.

The collar construction is a bit fiddly, which is noted in the instructions. I definitely read through this part several times before stitching anything. Make sure you mark all notches and circles. Usually I don't bother with them, but I marked them when I cut out the pieces and I'm glad I did.
I opted not to interface the entire facing because the fabric I used is medium-weight and I was worried the facing would make it too thick and stiff. {I interfaced the collar, but wish I hadn't. Just use your best judgment depending on the thickness of your fabric.} If you decide to leave out the interfacing too, then I would recommend to at least interface the buttonhole areas, which I did.
The sleeves in the tester were too slim for my huge guns. My arms are apparently not proportional to the rest of my body and I always have issues in RTW jackets. I cut a straight 2 in a muslin (the only thing I muslined), and sure enough it was too slim even with a 3/8" seam allowance. I made a whole host of modifications of the size 2 pattern to fit my arms. Whenever I make anything with sleeves I always check the bicep circumference, elbow circumference, and shoulder to wrist length and compare them to my measurements. I usually have to modify a lot on sleeve patterns so this wasn't atypical. You guys, seriously, can i haz Michelle Obama's arms????
Overall Fit
Remember that Heather Lou drafts for her height, 5'-8", so if you're severely vertically challenged like yours truly, then you'll need to do some major shortening. I shortened the bodice by 3" at the waist and the pants by 4" at the knee.
Overall Impression
I think this pattern is well drafted and I didn't have any issues with construction. I know some people may be thrown off for paying indie designer prices for a pajamas pattern, but I think it's worth it. I know I had reservations at first for paying for the Sewaholic Tofino pattern, but I've made that pattern more than any other pattern in my stash so it was definitely worth it.
Also if you have the Tofino and don't think you need this one, just know that they are completely different in terms of style and fit. The Tofino is all about super loose, tons of ease, "gimme-all-the-fucking-candy-and-that-tub-of-ice-cream" kind of pattern. The Carolyn is much slimmer fitting and makes you feel dressed up in a coordinated set of pajamas. Good thing I don't work from home or else I would never change because I would already feel like I'm wearing something presentable (to those invisible clients and colleagues).
And it can totally be upped in the sexiness factor if made out of a lovely silk charmeuse, which I was tempted to do for the tester, but I needed fabric right away so I settled with whatever I could find at the FIDM Scholarship Store, which is a medium-weight cotton with a slight stretch and I got it for $2/yard!! Love it when I score bargains.
It was great working with Heather and I hope my notes were useful to her and you. Feel free to ask any questions in the comments!
Not gonna lie, I was totally thrown off by pajamas. When Heather Lou had hinted on her blog that several patterns were in development I did not expect pajamas at all. But who doesn't want cute and coordinated pajamas? {and sexy, if you go that route} I don't think I've had coordinated pajamas since I was a kid so this pattern definitely filled a wardrobe hole, something I had been thinking of making ever since seeing Peneloping's cat pajamas.
Just be aware that this review is of the pattern tester version. There have been several changes, including sizing, in the final version, but I wanted to post about the tester version because I'm so happy with how it turned out.
The pattern is available as a pdf, which of course involves printing, cutting, taping.....lots and lots and lots of it. Not gonna lie. There is a fucking shitload of paper in this pattern, especially if you make the long sleeve top and long pants. I know some of you are adamantly against pdf assembly, but I don't think it's too bad if you just set yourself up in front of a good show (may I recommend a Law & Order marathon) and take it one to two rows at a time. Honestly, you don't have to assemble the whole damn thing at once. Usually after a couple rows you'll see if you can cut out a piece or two. It's much more manageable if you cut away pieces while you assemble the rows.
Anyway, off my pdf assembly soap box.....I cut a size 2 for both the tops and bottoms. The finished measurements for the tester showed quite a bit of ease in the bodice and I didn't want to be swimming in my top. However, I foolishly forgot to check the bottoms measurements, which was a huge mistake. So don't forget to check both your bust and hip measurement to make sure you're making the correct size for the top and bottom.
Pants
If you've made the Sewaholic Tofino PJs, then you'll find these easier to construct. I'm not sure why these patterns are constructed differently (and I'm too lazy to compare the patterns), but the Carolyn PJ pants construction seemed really straightforward in comparison.
I gave Heather two subjective comments regarding the pants.
1) I found the tester version to be slim in the pants, but apparently most testers thought they were too big. Part of the difference could be I made the wrong size and part of it is maybe because I like my PJ pants to be on the baggier side. {I'm swimming in my Tofino PJ pants, but I kinda like it!}
Heather did make changes in sizing for the final version, so I would strongly recommend you check the final measurements and do a quick check of the pattern pieces based on your widest measurement {for me, my hips, around the fullest part of my booty, are the widest}.
2) the cuffs were deep, which I think looked odd on my short self. I like them better folded in half (see above photo). I think Heather decreased the size of the cuffs on the final version, but if you're shorty like me, just take that into consideration.
I really like the pockets that are included in the pants.During the holidays I practically lived in my Tofino pajama pants and, I kid you not, I kept trying to put my hands in pockets! And every time I did, I was so disappointed I didn't have any. It's like Heather Lou was reading my mind. You can't tell in any of the photos, but I matched stripes along the pockets! **total nerd over here**
Top
I gave Heather one comment regarding the pocket construction, which seems silly because it's just a pocket. But a couple of my mens button-up shirt patterns use a different folding/construction method, which makes for a clean finish on the upper edges. Also, the original placement of the pocket is much too low on me. That was the first thing my husband noticed when I showed him my fancy PJs. He was insistent that I need to rip it out and move it higher, but I'm just too lazy to do it.

The collar construction is a bit fiddly, which is noted in the instructions. I definitely read through this part several times before stitching anything. Make sure you mark all notches and circles. Usually I don't bother with them, but I marked them when I cut out the pieces and I'm glad I did.
I opted not to interface the entire facing because the fabric I used is medium-weight and I was worried the facing would make it too thick and stiff. {I interfaced the collar, but wish I hadn't. Just use your best judgment depending on the thickness of your fabric.} If you decide to leave out the interfacing too, then I would recommend to at least interface the buttonhole areas, which I did.
The sleeves in the tester were too slim for my huge guns. My arms are apparently not proportional to the rest of my body and I always have issues in RTW jackets. I cut a straight 2 in a muslin (the only thing I muslined), and sure enough it was too slim even with a 3/8" seam allowance. I made a whole host of modifications of the size 2 pattern to fit my arms. Whenever I make anything with sleeves I always check the bicep circumference, elbow circumference, and shoulder to wrist length and compare them to my measurements. I usually have to modify a lot on sleeve patterns so this wasn't atypical. You guys, seriously, can i haz Michelle Obama's arms????
Overall Fit
Remember that Heather Lou drafts for her height, 5'-8", so if you're severely vertically challenged like yours truly, then you'll need to do some major shortening. I shortened the bodice by 3" at the waist and the pants by 4" at the knee.
Overall Impression
I think this pattern is well drafted and I didn't have any issues with construction. I know some people may be thrown off for paying indie designer prices for a pajamas pattern, but I think it's worth it. I know I had reservations at first for paying for the Sewaholic Tofino pattern, but I've made that pattern more than any other pattern in my stash so it was definitely worth it.
Also if you have the Tofino and don't think you need this one, just know that they are completely different in terms of style and fit. The Tofino is all about super loose, tons of ease, "gimme-all-the-fucking-candy-and-that-tub-of-ice-cream" kind of pattern. The Carolyn is much slimmer fitting and makes you feel dressed up in a coordinated set of pajamas. Good thing I don't work from home or else I would never change because I would already feel like I'm wearing something presentable (to those invisible clients and colleagues).
And it can totally be upped in the sexiness factor if made out of a lovely silk charmeuse, which I was tempted to do for the tester, but I needed fabric right away so I settled with whatever I could find at the FIDM Scholarship Store, which is a medium-weight cotton with a slight stretch and I got it for $2/yard!! Love it when I score bargains.
It was great working with Heather and I hope my notes were useful to her and you. Feel free to ask any questions in the comments!


This pj set turned out REALLY cute!!!! And I'm glad that you told me about the pockets in the pants, that is such a selling point to me! Like you, I love my Torfinos, but hate the fact that there aren't pockets. I always try to put my phone in my pocket and it drives me crazy when I can't. And thanks for the heads up on the shorty adjustments that you had to do. I'll probably have to do something similar :/
ReplyDeleteThanks, Erin! I just realized all of my photos have my hands in the pockets....I should have taken some photos without my hands in them. They're exposed, slanted pockets (not in-seam) so you could add a fun contrast print.
Delete